Towards Continuous Delivery in the B2B Domain: A Case Study
Sketchnotes for Jürgen Münch’s talk Towards Continuous Delivery in the B2B Domain: A Case Study

Diese Seite beschreibt die Software-Engineering-Beratung von Prof. Dr. Stefan Wagner.
Prof. Wagner hat in Augsburg und Edinburgh studiert und in München promoviert. Seit 2011 ist er Inhaber des Lehrstuhls für Empirisches Software Engineering an der Universität Stuttgart. Seine Schwerpunkte sind dabei Software-Qualität, Requirements Engineering, Safety/Security/Privacy Engineering, kontinuierliche und agile Entwicklung und Software Engineering für Künstliche Intelligenz.


Sketchnotes for Jürgen Münch’s talk Towards Continuous Delivery in the B2B Domain: A Case Study


Sketchnotes for Linda Rising’s talk Continuous Retrospectives


Sketchnotes for Grady Booch’s talk The Future of Software Engineering


Sketchnotes for our paper Does Outside-In Teaching Improve the Learning of Object-Oriented Programming? presented by Philipp Brune
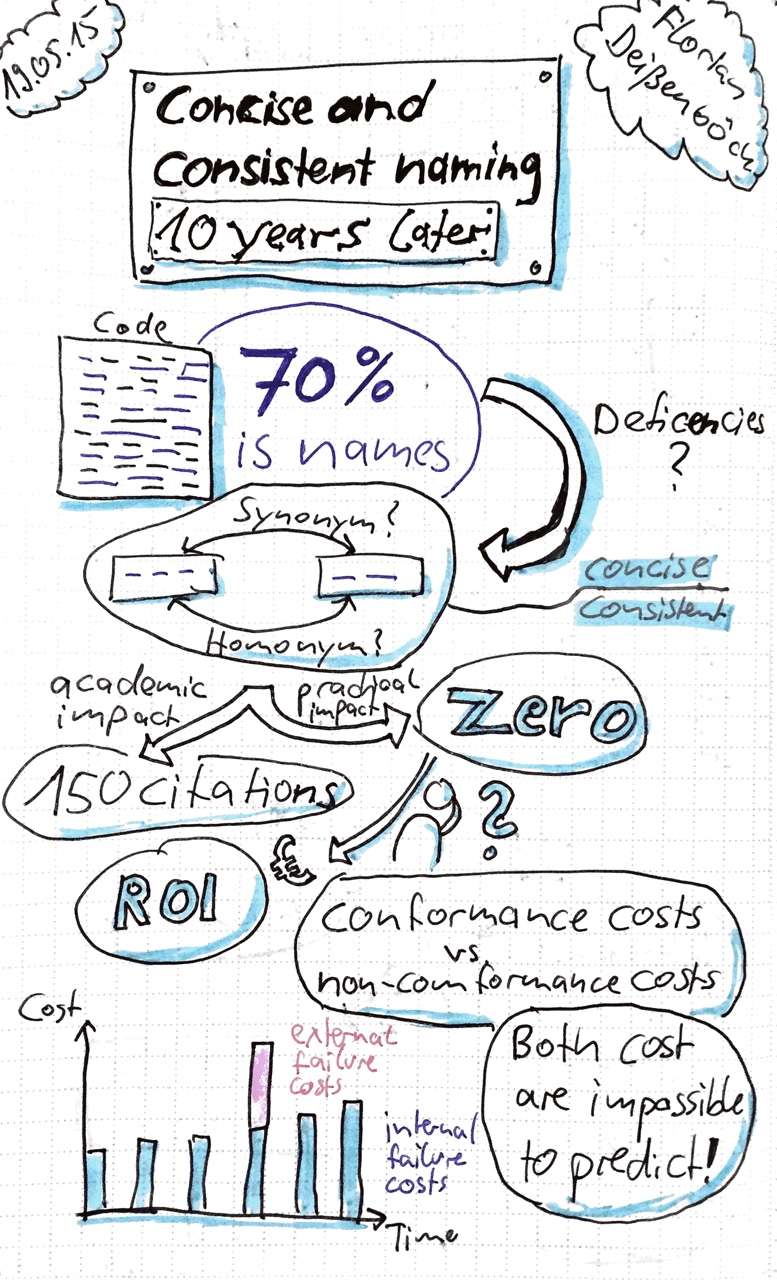

Sketchnotes for Florian Deissenboeck’s talk on concise and consistent naming: 10 years later
Viele Unternehmen schätzen, dass 20%-50% der Systeme nicht mehr gebraucht werden.
Ein Grund sind Probleme beim IT Business Case.
Technical Debt baut sich immer mehr auf, wenn Features verfrüht geliefert werden müssen.
Regulatorische Anforderungen, die umzusetzen waren, sind ein IT-Lackmustest, SOx oder SEPA. Für manche kleine Projekte zur Anpassung, für andere Riesenprojekte.
Schatten-IT ist doppeltes Vorhalten von IT, z.B. in Cloud Services.
Bei zu viel technischer Schuld wird sogar der Business Case für Ersetzung positiv.
Es werden veraltete Technologien und Methoden verwendet, in alte Technologien investiert und abgelöstes weiter verwendet.
Featureentwicklung wird immer aufwändiger. Es gibt hohe Test- und Einarbeitungsaufwände. Es gibt keine automatisierten Softwaretests.
Viele Workarounds und schlechte Stabilität. Ein Indikator: täglicher Neustart.
Fehler werden akzeptiert und nur einfache Fehler werden gelöst. Die eigentlich relevanten bleiben in der Software.
Wie kann man diese Probleme angehen?
Man muss immer argumentieren, warum man sanieren und nicht neu schreiben soll. Gründe sind Datenbankinhalte, Schnittstellen zu Nachbarapplikationen, die unklaren Anforderungen und die weiterlaufende Entwicklung.
Drei Schritte: Stabilisierung, Sanierung, Regelbetrieb
Erstes Ziel ist die Virtualisierung, um die Software auf Entwicklerlaptops zum Laufen zu bekommen. Dann muss der Build und das Deployment automatisiert werden.
TNG verwendet als Werkzeuge Stash, Confluence, Jira, usw.
Umsetzung wird agil durchgeführt. Am Anfang großes Kanban-Team. Für konkrete Stories werden dann Scrum-Teams verwendet. Der Kunde muss überzeugt werden, dass am Anfang eines Sanierungsprojekts nicht viele neue Features realisiert werden können.
Am Anfang ist das Fixen offensichtlicher Fehler eine große Gefahr, weil noch keine automatisierten Tests existieren. Vielleicht ist er später im Code durch einen Workaround aufgefangen.
Die ersten Codeänderungen ohne Tests sollten mit Pair Programming und/oder mit formalisierten Codereviews geprüft werden. Refactorings nur minimalistisch und möglichst mit Werkzeugunterstützung.
Dann initialer Testaufbau von automatisierten Integrationstests. Dies braucht Schnittstellensimulatoren. Damit ist die Testausführung langwierig. Die Definition of Done enthält, dass ein neuer Test pro Fehler geschrieben werden muss.
Behaviour-Driven Development Reverse mit JGiven und Testdatengenerierung mit EntityBuilder. JGiven generiert aus automatisierten Tests menschenlesbare Testspezifikationen.
Wie lerne ich, was die Applikation tut?
Quellen sind Exceptions und Log Files. Evtl. müssen diese noch mit weiteren Informationen angereichert werden. Außerdem gibt es Informationen aus dem Monitoring und Performance-Messungen. Wenn nicht klar ist, wer Interfaces verwendet, dann kann eine Firewall davor eingebaut werden. Wenn sich dann niemand beschwert, dann scheint man alle Aufrufer zu kennen.
Mit kleinen Releases kann man in kleinen Schritten verbessern, aber es werden auch Dinge kaputt gehen.
Dokumentation wird in einem Wiki aufgebaut. UML Sequenzdiagramme mit PlantUML um Szenarien zu beschreiben. Release Notes mit Testberichten sollten automatisiert werden.
Bei hoher Testabdeckung können getrennte Teilsysteme wieder zusammengeführt werden.
Wann ist meine Sanierung erfolgreich?
Ein KPI sind Fehler pro Zeit. Aber es werden am Anfang nicht weniger Fehler pro Zeit, weil viele neue Fälle genutzt und getestet werden. Wenn die Weiterentwicklung wieder möglich ist, kann die Software wieder in den Regelbetrieb überführt werden.
Wie vermeide ich Sanierungsfälle?
Man kann die IT in Fast IT und Core IT aufteilen. Fast IT zur schnellen Validierung von Ideen. Falls es funktioniert, wird es mit allen Qualitätsanforderungen in die Core IT überführt.
Call for Papers
Special Session on Automated Quality Assurance
at the Scientific Program of the Software Quality Days 2015
Vienna, Austria
20.-22. January 2015
http://2015.software-quality-days.com
The 7th Software Quality Days (SWQD) conference and tools fair – one of the largest software quality conferences in Europe - will bring together researchers and practitioners from business, industry, and academia working on quality assurance and quality management for software engineering and information technology.
SWQD will again host a scientific program on software quality research. It has established itself as an important meeting of software quality researchers. This year, we hold a special session on automated quality assurance to emphasise this important topic.
Research in software quality assurance (SQA) is more and more driven by automating SQA tasks. For example, researchers work on automating test generation and execution, detecting clones or predicting fault-prone components. These activities are not well integrated, however. This is why we plan this special session with the aim to discuss the connections in automating quality assurance. The general requirements on the submitted papers are the same as on the technical research papers but they need to relate to the topic of the special session.
Publication Requirements
The language of the scientific program is English. The scientific program papers will be rigorously peer-reviewed for publication in the well known research publication series Springer LNBIP.
See the LNBIP Website for author instructions.
Papers must not have been previously published or submitted for review elsewhere. If accepted, papers must be personally presented at the Software Quality Days 2015 Conference by the author or one of the co-authors. The first presenting author can participate free of charge at the two conference days. Additional authors/presenters can participate at a discounted partner fee.
Paper Submission
Please submit a PDF version of your paper via EasyChair.
Please select as paper category “special session on automated quality assurance” during the submission process. The assignment to full and/or short papers is implicitly given by the number of pages per submission.
Important Dates
Special Session Chair: Stefan Wagner, University of Stuttgart
"On Writing Well" is a classic book on writing nonfiction that recently celebrated its 30th anniversary. As my main area of writing is scientific writing, I read it with the intent to learn for my scientific papers.
With this background, my judgement on the book is mixed. There are several chapters that are useful for scientific papers but a good share of the book is written for journalists. The view, which is the view Zinsser himself probably has, is that of a generalist writer who has to explain something to the public. This does often not fit very well with the intention of most scientific papers.
Most useful for me was Part I "Principles" and Part II "Methods". What he explains there is almost universal. He talks about simplicity and style, about words and their correct usage. I especially enjoyed Chapter 10 "Bits & Pieces" in which Zinsser collected short but helpful hints for your everyday writing.
Part III "Forms" includes chapters such as "Writing About People: The Interview" or "Writing About Yourself: The Memoir" that didn't help for my usual tasks. Even Chapter 15 "Science and Technology" was not what I was looking for because it covered much more the journalists's view. To some degree Chapter 16 "Business Writing: Writing in Your Job" could give some insights for my writing.
Overall the book is fun to read and Zinsser proves in it that he is the right guy to listen to on writing well.
I don't have a desktop computer anymore because everything I need is on my laptop computer - a MacBook Pro. Although the speakers of the MacBook are actually not bad, I prefer my normal hi-fi system for listing to music and watching movies. Therefore, I have a cinch connector cable to get the sound from the MacBook to the hi-fi system. But that bounds me close to the hi-fi system and the MacBook is not portable around my room anymore.
The solution here is Apple's Airport Express. For this purpose, it acts as a audio streamer. It has audio output interface and connects to any WLAN. Hence, the cinch cable now goes into the Airport Express and I stream the audio from iTunes to it. There is my music on my hi-fi system without any cable going out from the MacBook.
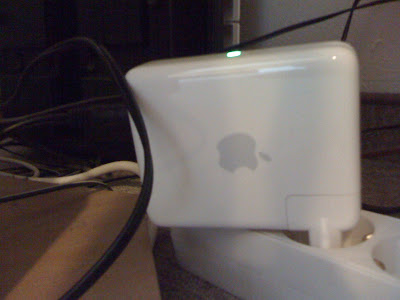
The installation is actually quite easy. It comes with a CD on which you find the tool
Airport Utility
that lets you configure how the Airport Express should work. It can establish its own WLAN or connect to an existing one for which you have to provide the access information, of course. It has a couple of more features that I don't use such as acting as a print server if you connect a printer to its USB port.
One problem, however, still remains. iTunes lets you only stream music to the Airport Express. Watching movies or TV is not possible. The solution here is the application
from Rogue Amoeba, available for Mac and Windows. It allows you to stream any sound from any application to Airport Express. This is actually what you expect would work out-of-the-box, but you have to invest $25 for the current single-user licence price. By adding the so-called Extra Instant Hiack it can steal the sound output from any application and send it to Airport Express. This even works for EyeTV and with the included video player also for movies.
